Blacksmiths Polish is a mixture of Bees Wax and Linseed Oil that is applied to metal and wood surfaces to protect, waterproof and lubricate. It’s touted as a perfect protective coating for hand tools and is used on wood planes, hammers, handles and hard surfaces such as table saw tables.
My search started with a simple question…
What if there was a simple rub on coating that could:
- Prevent iron from rusting?
- Lubricate working surfaces?
- Water-proof leather?
- Protect wooden handles from drying out?
What if it was a 100+-year-old formula, made with natural, mostly non-toxic household materials… Sounds pretty good, right?
Seems like if all of that was true, someone would’ve slapped a label on that shit and start selling it yesterday.
Well, they did, and they are. There are actually a few dozen products — from boot water-proofing to furniture polish — all share the same heritage. They are each simply twists on the old blacksmith polish of years back.
I started experimenting with this paste a couple of days ago and already I’m wondering why I never heard of it before. Alright, let’s take a step back and start at the beginning…
What is Blacksmith Polish?
The original formula I found was equal parts Bees Wax, Boiled Linseed Oil and Natural Turpentine. But the formula went on to suggest how by adjusting the formula you could make a thicker or thinner “paste” depending on your application. Further research provided lots of simple adjustments that could be made to produce not only altered consistencies but more effective coatings depending on the desired use.
Today I’m going to focus on the original 3-part formula because that’s what I’ve been playing with. The formula is equal parts by volume. I started with a small batch as I was pretty skeptical (I actually sat on the recipe for 5 months before I even bothered to make it).
Here is how it’s supposed to work. The wax dissolves in the turps and is blended with the linseed oil. When the paste is applied to a surface the solvent (turps) evaporates leaving the oil-wax mixture on the surface. The wax fills any crevasses and provides a smooth, waterproof surface. The oil polymerizes holding the wax in place and providing a more durable crosslinked coating.
What you’ll need:
- 4-ounces of Bees Wax [1-ounce (weight) is 1-ounce (volume) for bees wax]
- 1/2 cup Boiled Linseed Oil (I used hardware store imitation boiled)
- 1/2 cup Natural Turpentine (again went with hardware store)
The process is simple: melt wax, remove from burner add solvent and oil, mix until blended.
The instructions said to use a double boiler to melt the wax. It went on to say that it will take several weeks for the wax to completely dissolve and become part of a homogenous mix. There was also a big, bold warning about never heating the mix or instant fire would consume you and everything in a 5-mile radius. Heating solvents is usually a pretty bad idea, so even though I completely ignored this warning I’d suggest you heed it unless you’re prepared to deal with a sudden flash fire.
Here is how I made it.
I placed a shallow pan, filled with an inch of water on an electric hotplate (outside). In the pan–submerged in water–I placed a metal, 1-quart paint can (it was way too big, but whatever it was all I had). In the paint can I added the beeswax and heated until all of the wax was melted. I removed the can from the burner and added the turps, and linseed oil. I then returned the can to the pan of water to speed the dissolving process. Once the wax was re-melted I removed the can from the burner and set it aside to cool.
For me, this mixture was a little too thin. It was similar to applesauce in consistency and color, and I was hoping for something a bit stiffer. I left the top off of the container and allowed more turps to evaporate and within an hour or so it was where I thought I wanted it. A stiff, yet spreadable paste, similar to car polish.
How’s it work?
I’ve been applying this stuff to all manner of tools and surfaces to see how it feels and performs. I’ve been very happy with the results so far…most of the time. Let’s look at a few of the surfaces its been applied to.
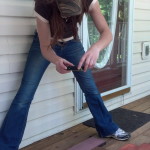
First I applied it to an old cast iron table top on my bandsaw. This surface seems to rust no matter what you do to it. Rust makes the surface rough and makes sliding material through more difficult. The paste went on smooth, buffed right off and left a nice smooth, slightly slick coating. It’s only been a few days, I’ll let you know in a month if it remains rust free. (update: it did.)
Next, it was applied to a few large wrenches. These wrenches are rarely used and pick up dust, then moisture, then rust. Used or not I have to oil them bi-yearly and that’s never quite enough. They always have specs of rust. Again the wax went on smooth and they feel great. The wax provided a nice tactile “sticky” feeling. Much better than oil which leaves them well… oily.. go figure.
I also coated a number of wooden handles. Some raw wood, some coated with poly or other coatings.
On the raw wood, it soaked in quickly and filled in the grain leaving a pretty thick coating compared to say linseed oil alone. The material dried to the touch nearly instantly but felt slightly sticky for a couple of days after. Once the linseed oil fully oxidized the handles feel great, smooth, neither slick nor tacky.
Applied over poly the results are a bit different. Right quick the surface felt waxy. After three days no change whatsoever. It’s an acceptable, easy to grip surface but it’s not nearly as pleasant to hold as say a raw linseed oil treatment would have been. Is it better than straight poly, I think, but it’s not as “warm” as I would like. I have a feeling a harder wax would help a lot here, but more on that in a moment…
Next up was a large C-clamp which was made from uncoated cast iron and had a lot of texture. It was hard to buff off the excess wax off, and the coating here was much thicker than on any other surface. The threads also held onto quite a bit more than I would like, and required a bit of work to clean up after application. After 3 days the surface still feels tacky, and the threads–though dry and slick–feel sluggish. They don’t have that smooth feeling they would with a straight light oil coating. I think for textured metal surfaces and threads blacksmiths polish is a poor choice.
Lastly, I coated a section of a plywood shelf, again rubbed on thick and then buffed off. The wood soaked up the wax emulsion and was well coated. Boxes and tools slid freely on the coated surface and I’d like to think it’s somewhat better waterproofed after the coating. The best part is no dry time. Rub on, buff off, put tools back.
Side note: The rag I used to apply this stuff took on a nice waxy feel and after it dried was durable yet flexible. With a little tweaking of the formula, it may provide a simple coating for making waxed-canvas fabrics.
Bottom line:
When used on smooth surfaces–that do not need wear-resistant protection–it seems like a winner. 2 thumbs up (as they say).
In my opinion, any protective coating you can simply rub on and are free to use the surface right away is a win in my book. It has not been long enough to say if the coating will be durable (I suspect it will not be) or if it will truly prevent rust (though there are hundreds of results on google saying it will).
I like it better on metal than wood, but it works on both. I think it will be perfect for winterizing my garden tools and frankly any tools that are not regularly used. It feels like it’s a perfect fit for a few applications such as trowels and shovel blades, where a slightly slick coating of the metal would provide not only better usability but also make cleanup a whole lot easier.
What’s next?
First I want to play with some other waxes, particularly harder waxes such as Carnauba and Paraffin. I’m going to try using 50% less solvent next time and may experiment with additives particularly Stearic Acid (durability) and possibly graphite (light lubrication).
Just a quick note before we get into the experiments. It’s now been over a month since the first tests and many surfaces have been coated with both the original formula and subsequent batches and blends. Overall the finish of the paraffin wax has been superior on all surfaces.
The coating of metal and wood and proved to be moderately durable. On cast iron tables that are in regular use, the wax has held strong and has not needed any touchups as of yet.
UPDATE – 8/19/18 (Sunday)
Wanted to try a batch of the Blacksmith polish using Paraffin wax vs Beeswax. From the first batch, I had an idea of the loadings I wanted to aim for; less solvent, similar wax and polymerizing oil content, if anything going 20% heavy on the wax content.
Paraffin is less dense and wanting a slightly higher wax loading I opted for a last-second addition of about 20% to the was content.
1# (453.6g) paraffin = 20 fluid ounces.
1 fluid ounce = 22.68g (181.5g per cup)
| Wax type |
Density (g/cm3) |
| Paraffin wax |
0.88-0.941,2 |
| Beeswax |
0.951 |
Formula:
- WAX = 222g (about 9.8 fluid ounces)
- Boiled linseed oil = 1 cup (8 fluid ounces)
- Turps = 5/8ths cup (about 5 fluid ounces)
Steps:
The process was the same as before, melting the wax, adding the liquid components, returning to the double boiler and heating for an additional 10 min while stirring.
UPDATE – 8/23/18 (Thursday)
The polish as made was difficult to use. It was harder than expected due to the decreased solvent and increased wax loading. Lesson learned.
I decided to re-melt and introduce more solvent and “make up for” the additional wax content by adding more linseed oil. This is just an experiment so the additions were rounded to keep things simple.
Once melted I added 1/4 cup of linseed oil and 1/2 cup of turpentine (solvent). This brings it back to close to the original formula.
New Formula:
- WAX = 222g (about 9.8 fluid ounces)
- Boiled linseed oil = 1.25 cups (10 fluid ounces)
- Turps = 1 and 1/8ths cups (about 9 fluid ounces)
Steps:
The can containing the previous batch was placed directly on the hotplate and melted (this took about 15 min). Once melted the can was removed, additional liquids added then stirred. It stayed liquid so no additional heading was needed. It cooled over the next 5 hours to a thick paste with some free liquid so too much solvent and linseed oil was added.
While cooling I again shook the can to create a froth, this time I was unsuccessful in getting a foamy texture. upon cooling it was a paste similar to the original wax.
Results:
The new formula feels wonderful on wood but takes a while to dry and set. There is again too much liquid loading. Getting the %s right has been difficult.
Note on 8/24/18: I rubbed this in its wet form onto a couple of older dry handles. On the first day, they felt a little wet but still good. They looked amazing though! By day 2 they feel much better, dry, smooth but not sticky. They are easy to grip but not at all tacky. I think paraffin fixes a lot of the problems I had with beeswax on handles.
I also applied a little more to some metal surfaces and it feels good and is a little darker looking than the beeswax. It’s also harder to get an ultrathin buffed coating. If you use a fresh cloth to do the buffing this problem goes away, but I’d rather not have to dirty two rags. Once coated with wax these rags are really only good as firestarters thereafter! haha.
The perfect combo is close, but its almost definitely a blend, which stands to reason since the MSDS for most of the wax polishes contain a blend.
Next Steps:
I still plan on adding different waxes to this mixture for durability. I’m waiting for a pound of Carnauba wax to arrive this will be added to this batch or a new batch. From what I have read 100% Carnauba is hard to work with as it hardens quickly and is not easy to spread or buff if a softer wax is not added. I’m estimating that adding 10% Carnauba wax to this batch should result in a thick paste that is workable, but I do not know (no experience with this new wax).
I may also leave the cover off while stirring occasionally to dry\evaporating some of the solvents and produce a thicker mix. Or I may really get crazy and add more wax…again messing with the formula.
Some of the material has been used, so the exact percentages are no longer 100% known. This limits what can be learned from this experiment.
UPDATE – 8/24/18 (Friday)
Ok, one more try!
I didn’t like the consistency of the last batch and wanted to simply experiment with adding more wax. I’m now in between the original formula which was too stiff and flakey and the last batch which was too thin.
I honestly think I probably went too heavy on the wax content, but it just felt right at the time of the test.
This is getting to be more of a “fun” experiment than a scientific process.
The table below outlines all three batches in percents.
|
Too Thick |
|
Too Thin |
|
Try Again |
|
fl oz. |
% |
|
fl oz. |
% |
|
fl oz. |
% |
| 100% Parafin Wax |
9.8 |
43% |
|
9.8 |
34% |
|
14 |
42% |
| Linseed Oil |
8 |
35% |
|
10 |
35% |
|
10 |
30% |
| Turpentine |
5 |
22% |
|
9 |
31% |
|
9 |
27% |
New Formula:
- WAX = 320 grams (~14 fluid ounces)
- Boiled linseed oil = 1.25 cups (10 fluid ounces)
- Turps = 1 and 1/8ths cups (about 9 fluid ounces)
Steps:
Same as above.
Results:
Finaly a good ballance between softness and ease of application.