Aug 062018
 

Inspired by the Tool File Condom, Mike and I were talking about storing and transporting tools. We thought it would be nice to create some kind of pouch for the tools he sells. Sounded like a fun project so I told him I’d prototype something.

Last night I went to work and built what I would like if this was something for me. As usual, it came out nice, but overly complex. The time to build it would make it a little pricey to sell.

I like to start right and take away features people don’t want to pay extra for until you end up with something that’s pretty good and still affordable. For instance, the padding is probably excessive, you’d have to be pretty rough to damage this

I took a quickie video for Mike and you can watch it below.

This is just a quick update for you guys since I have not been posting in what seems like forever.

A few pictures from this project:

Apr 082018
 

This weekend I built a spiffy… DIY Garden Tool Rack out of scrap wood.

It was an unexpected project that started because I wanted to make something else altogether but couldn’t get to my drill press due to all of the garden tools being stacked in front of it.

It’s pretty simple. Designed to be columns of tools. The columns are spaced to allow for large items such as pickaxes and tall items such as hoes. The design is not optimal for rakes and shovels…but that’s another project. It needed to be on wheels (casters) and be able to easily hold 500lbs AND needed to be small enough to not increase the footprint the tools are already taking up.

Here’s what I came up with:

DIY - Garden Tool Rack

— Click to see full-size pic —

I really rushed this project trying to get it done in a weekend and honestly, it suffered because of my lack of time. I was painting in 40-degree weather, and applying topcoats over paint that wasn’t completely dry.  Even stenciled over wood that was not yet clear coated.

While it came out OK, it could have been better if I was able to take my time. I was hell-bent on getting it complete in the single weekend so I could move on to projects I actually wanted to work on. I definitely have ideas of how I can do it better next time and there will be a version two eventually. this one is good enough for what I need right now.

Materials: Made completely from 2×4 and 2×3 cut offs and some scraps of 3/4″ oak plywood. 2 of the 2x4s were actually rescued from the outside burn pile, lol.

If anyone wants to copy the design let me know I can provide drawings and stencils. Here are some shots of the assembly. you can probably get everything you need from the pics.

Apr 012018
 

With all of the old hammers and hatchets, I have in progress, I have been making handles when I have time. It’s a fun and satisfying project but also a long slow process. Each handle takes about 2-3 weeks to finish. It’s not that they actually take weeks to make, its that I can only dedicate a couple of hours here and there.

This weekend we have two nice days back to back and I was able to get a little time to apply some stain. I saw some pictures of an ax handle finished with colored stain and really wanted to give it a try.

Because I was fooling around a little too much I ended up with glue from electrical tape on the unfinished wood of two handles. It looked pretty bad and I couldn’t get it off without taking off the stain. …and generally making a heck of a mess. So I got this idea, what if I hide it under some fake age… I could just rub charcoal over the area making a cool looking smudge and the ugly tape would be hard to see.

Well, it didn’t work like I expected, but I’d say I accidentally discovered a nice way to really make the grain POP. I’m going to try some other materials and see if I can get some other interesting effects.

Anyhow without further ado here are a couple of items I worked on this weekend showing off their charcoal rubbed goodness.

First a nice old Blacksmithing hammer.
A 24 oz. Plumb Ball Pein Hammer, with a stout, squared off handle.

Plumb 24oz Ball Pein with Green Handle

Plumb 24oz Ball Pein with Green Handle

Next up is a simple and well worn half hatchet. It had a little bend in the bit but since it’s the older style eye, it seemed worthwhile to restore and put back into use.

Craftsman 15 oz.  Carpenters Half hatchet with a contoured rounded handle. 

Craftsman 15 oz. Half-Hatchet w/Green Handle

Craftsman 15 oz. Half-Hatchet w/Green Handle

Craftsman 15 oz. Half-Hatchet w/Green Handle

Craftsman 15 oz. Half-Hatchet w/Green Handle


Tweet about it: https://twitter.com/BrianPaonessa/status/980568765313306624

Mar 202018
 

WOW, got to say thanks to Jess and the Ralphs! You all outdid yourselves!

Lately, my obsession has been cleaning up old tools. Particularly old rusty axes, hatchets, and hammers. Jess and I have been keeping our eyes on eBay watching for cheap auctions to snatch up and put back into service. I’m sure I have said it here before, but I’m always excited to daydream about what an old tool may have been through over the years.

An old mushroomed hammer or chips in a bit are all markers of work that was done long in the past. Every few weekends I’ll fix up another and Jess and I will go out and chop up a fallen tree or stump to check them out. It’s been fun and I’m getting a small collection. I now have a few items that are around 100 years old, keeping them in service seems important to me.

Well, my birthday was on the way and Jess and her parents conspired to overload me with fun work. …And they succeeded in spades.

Considering that I’ve had some eBay luck recently too my backlog of projects is impressive.

Below are some pictures of the take to help me track what’s still left to finish. As always I’ll post links to the finished tools as they are completed. With this many, it’s going to be a while!

Hatchets

Style (best guess) Length Width Who Lb./Oz. Grams Notes
Plumb Half Hatchet 5-7/8″ 1-1/4″ Bill 1# 6.1 oz. 630 g. Crack in Poll
Unmarked Shingling w/Nail Pull Hatchet 5-3/4″ 1″ Bill 1# 6 oz. 627 g.
Americanax Half Hatchet 6-1/2″ 1-1/8″ Bill 1# 3.4 oz. 543 g. 1920s, Glassport, PA
C. HAMMOND Half Hatchet

(found a picture of another, stamp matches)

5-7/8″ 1″ ?? 15.9 oz. 454 g. 2
CHAMMOND
PHILA
CAST STEEL
Germantown Lath Hatchet 6″ 1-1/4″ Bill 14 oz. 397 g. Cut and Modified
Kelly Works Half Hatchet 6-3/8″ 1-1/8″ Jess ? oz. ? g. Weldmark
Unmarked Shingling Hatchet 6-5/8″ 1-1/8″ Jess ? oz. ? g.
Unmarked Half Hatchet 6-3/8″ 1-1/8″ Jess ? oz. ? g.
Plumb Riggers/Half Hatchet 6-1/2″ 1-3/8″ Jess ? oz. ? g.  *fav*


Hammers

Style (best guess) Length Width Lb./Oz. Grams Notes
Craftsman 1 lb. Masonary Hammer 7″ 7/8″ 1#  0.6oz. 473 g.
Bimgham’s Best Brand 30 oz. Ball Pein 4-7/8″ 1-1/2″ 1# 13.5 oz. 836 g. Likely 1920s
Craftsman 24 oz. Ball Pein 4-1/2″ 1-1/2″ 1# 8.3 oz. 691 g. Early 1930s
Plumb 24 oz. Ball Pein – Finished 4-5/8″ 1-1/2″ 1# 7.6 oz. 670 g.
Plumb 15 oz. Ball Pein 4″ 1-1/4″ 15.4 oz. 438 g.
Stanley 16 oz. (310B) Ball Pein 4-1/8″ 1-1/4″ 15.8 oz. 448 g. JobMaster
Fairmont 16 oz. Ball Pein 4″ 1-1/8″ 15.9 oz. 451 g.
Ball Pein Blank 12 oz. (no eye) 3-3/8″ 1-1/8″ 11.9 oz. 337 g.
Unmarked 8 oz. Ball Pein 3-3/8″ 1″ 8.7 oz. 248 g.
“Forged” 5 oz. Ball Pein 2-3/4″ 7/8″ 5.3 oz. 152 g.
Stanley Ball Pein 3-3/4″ 1-1/4″ ? oz. ? g.
Unmarked Ball Pein 3-1/4″ 1″ ? oz. ? g.


Also See:

Jan 272018
 

A while back I picked up some rusty, old garden tools from my friend Harry’s House. If you’re interested you can find more information here.

Paint day

Jess was away for the week and the weather was nice so it seemed like a perfect time to get some painting done. A couple of weeks before I removed the rust using naval jelly and gave them a couple of coats of prime (Rust-oleum Rusty Metal Primer). On painting day they were sanded almost to bare metal and prepared for paint.

The handles on two of the shovels were painted metal flake blue–which I really liked. I had a couple old cans of Dupli-Color MetalCast paint, one was blue so I thought that would be a perfect fit. The MetalCast spray paint requires a base layer (metal flake ground coat), which I had a can on hand. Unfortunately, that was only enough to do some of the tools and one shovel had to be put away for another day.

I hadn’t used this paint for a while and I forgot how frustrating it is. It spatters, clogs and is just generally frustrating, that being said its amazing if you take your time. The spray paint, now 10+ years old was particularly frustrating. The blue can was only about 1/3rd full, and was depleted very quickly, but I had a partial can of purple and green which I finished up the project with.

Before Paint:


After Paint (Day 1):


Update: After Paint (Day 2):

Update: 2/15/18 – More tools completed and ready to use.

After a couple of cold rainy weeks the sun came out for a day and I quickly gathered some more tools that were ready for paint. Most of these got primed over a month ago and got all non-working areas coated with metallic paint a few weeks ago in the paint project above. Today was just finishing the working surfaces with a coat of flat black paint. I really think the floral spade came out especially nice!

Jan 272018
 

My dad always had every possible tool on hand. These days I’m always trying to force the wrong tool to do the job. While I can’t afford to buy quality new tools, in this throw away world you can often find great vintage tools on eBay for just a couple of bucks.

I’ve been keeping my eyes open for old tools on eBay and when I find interesting stuff for only a couple of bucks I bid, and occasionally win a lot or two. Since I’m trying to keep my costs below $10 shipped I usually watch for lots, which offer the best pricing.

Here are two lots I won recently. Among them are a few items I’m really excited about.

Lot #1 contains a couple of really nifty small hammers made from great steel.

Lot #2 contains a mini miners pick and a craftsman half hatchet.

Also included is a picture of some handles I picked up in town.

Lot #1: Assorted Unusual Small Hammers

Style (best guess) Length Width Shape Lb./Oz. Grams
Brick Hammer 6 3/4″ 7/8″ Square 1# 457g
New York Style Masonry Hammer 5 3/4″ 1 1/8″ Square 1#/5oz 600g
Tinners Setting Hammer 5″ 7/8″ Square 14.5oz 400g
Cross Peen Forming Hammer 5″ 7/8″ Circular 1#/1oz 490g
Riveting Hammer 4″ 3/4″ Square 10.5oz 300g


Lot #2: Half Hatchet, Mini Mining Pick, Claw Hammer and Ball Pein Hammer

Style (best guess) Length Width Shape Lb./Oz. Grams
Craftsman Half Hatchet – Finished 6″ 1″ Round 15oz. 422g
Ball Peen 4″ 1-1/4″ Round 1#/2.7oz 533g
Curved Claw Hammer 5″ 1″ Round 15.5oz. 436g
Small Prospecting Pick
(maybe a Lining Hammer)
8″ 1″ Pick 10oz. 283g


Handles Ready for Heads Above (Mostly from Nichols Hardware in Purcellville, VA)

Assorted Hammer Handles


Some additional cool hammers can be found here Small Rusty Hammers (part two?)

Dec 232017
 

Merit Jersey Pattern Felling Axe
Date: 1927
Weight: 4-1/2 lb.
Markings: “Merit \ Hand Forged” and 42 on the bottom of the poll
Pattern: Jersey Pattern or a Virginia Pattern

History: Merit was a Sears “brand” and Craftsman bought them in 1927. The scripted “M” in Merit was suggested to be a early stamp, but that’s from an unreliable source.

Here is a great find rescued from Harry’s Barn. This axe head was rusted up badly, but no chips. The axe had not been used much, the poll was in good shape, not much mushrooming. Harry said it belonged to his grandfather on his mothers side and that he has not used it much he preferred the other axe (a Collins commander for chopping wood).

Because of the age and the history I chose to leave this axe with as much character as I could.

The new handle is a 36 inch Link from Nichols Hardware Purcellville a wonderful old time hardware store. When I removed the varnish from the new handle I left behind some so when it was oiled and stained it would show some splotches (my hope was it would look warn from use). It didn’t come out exactly as I planned but I like the look .

Post about the “haul” here: Free Rust (May Contain Some Old Tools)
Facebook Post (private group): https://www.facebook.com/groups/AxeJunkies/permalink/1633658086672752/

Dec 102017
 

Simple DIY ultra-plush dog bed from old bedspread and pillows.

Jess and I cleaned out one of the closets and found that we had a couple of pillows and a bedspread that we were no longer using. I really don’t like throwing away usable items so I thought perhaps some dog begs would be the order of the day. After measuring everything out I found I had just enough to do three beds with 3 neck pillows. One for each dog in the office, and one for downstairs near my sewing machine (the floor gets cold down there).

Considering that all of the materials were heading for a landfill, I’d say the project was a huge success.

The fabric is medium weight duck cloth in the Next Geologic Camouflage Pattern. I did a similar set of dog beds using this pattern for their crates about a year back and they have performed and laundered well.

The bed is pretty simple, a padded bottom is attached to a heavily padded ring (for structure). Then a full-width pillow top is inserted into the ring. This makes the bed easy to clean, just pop off the pillow and wash. In the event of an accident, the entire bed can be laundered since it’s cotton with polyfill. Both the pillow top and padded bottom are semi-quilted in 6 places so the fill will not shift even in machine washing.

Size-wise our dogs are medium sized. They weigh around 60 lbs. each and the beds are about 38 x 24 providing more than enough room for them to curl up and get cozy. They are still a little small for stretching out. That being said, Jess proved that there is even enough room for a Jess plus a Muffin with room to spare!

If anyone wants to make one, let me know, I’ll post plans below.

Nov 262017
 

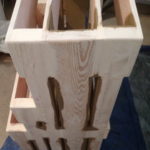
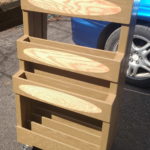
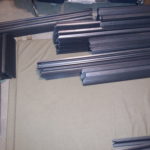
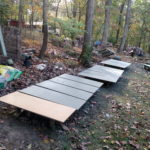
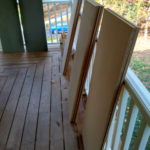
The new Muscle Rack Shelves are looking amazing but the color was not what I wanted and the paint used, while about as durable as anything you’re gonna’ find at a big box store, is not up to the task of industrial shelving so its time to paint again.

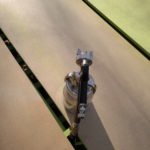
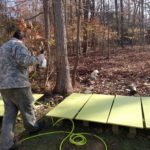
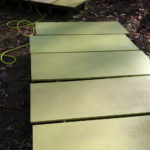
Originally we decided on a bright, almost fluorescent green called Sherwin Williams Parakeet [SW 6711]. It is a soft tennis ball green color that reflects LED light very well, and somehow is not an eyesore (but be careful looking at it outside in direct sunlight! Total blindness). I got a few cans of Solo made up in this color and proceeded to prime the particle board shelves.

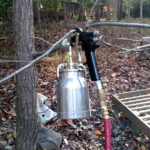
Solo goes on pretty thick and needed to be thinned about 30% before I could get an even light spray. It was applied in 3 thin coats to get good coverage but also because it just did not want to feed in my siphon gun. I love this old siphon gun, but its finicky and will fight you if you don’t get the paint and airflow just right.


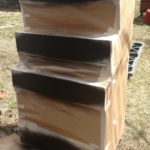
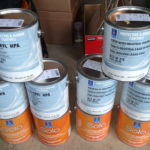
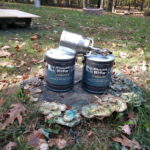
Did you ever wonder what $1,120 in industrial enamel coatings looks like?

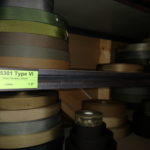
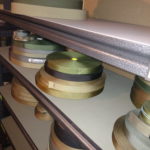
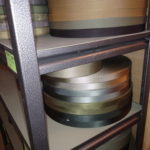
Well today is your lucky day because here is 3 gallons of Sherman Williams Sher-Cryl HPA, 3 gallons of Water-Based Industrial Enamel and 4 gallons of Solo (their home grade paint-plus-primer in an enamel base). That’s right 10 gallons of paint with the multi-gallon discount it still averages $110 per can.

But you know I’m a cheap bastard, so no way I paid that, not a chance.

Would you believe $11 dollars for all of it after tax? Well that’s what it cost.

This was definitely my lucky day.


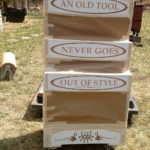
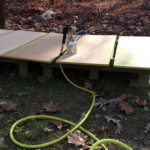
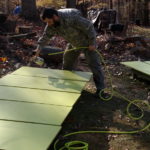
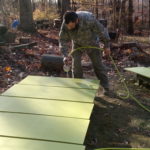
Spraying took almost all day but I got them all coated and looking pretty good. They could actually use a sanding and second coat on the wear side just to make sure they hold up.

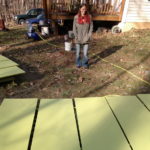
I’m really happy about the color, it’s a little bit lighter then the sample chip but it looks good in the LED lighting in the sweat-shop and garage.


If you interested in this project, and want to see the shelves in use, the first post about it can be found here: New “Muscle Rack” Shelving.

Oct 282017
 

My sewing projects require a very diverse assortment of narrow fabrics from Webbing to Velcro to Elastic and Binding tape. Since every pattern and color I add, increases the footprint by a significant margin, it was becoming a huge unwieldy mess.

The shelves already in the basement were mostly a hodgepodge of narrow plastic shelving and book shelves. None of which was cut out for the job. Not only was the narrow width cutting into usable space, but the weight of this fabric was taking a toll on the shelves. An upgrade was long over due. I was able to acquire 13 heavy duty “Muscle Racks” from the warehouse and set out to make them usable for my sewing supplies.


The first and most important thing to do was give everything a thorough cleaning. Then paint and seal the particle board shelf’s so they would hold up better in a slightly damp basement.

Jess and I spent way to much time looking at paint chips and trying to find a color that would be bright enough for the basement but wasn’t an eye sore. The color not only had to be bright, but hide dirt and scuffs, it must also blend in with the fabrics. Kind of a tall order, but we selected a color (Sherwin Williams Parakeet) and settled in their high end enamel paint.

Well long story short, it got cold, painting was delayed. The weather broke one weekend and I grabbed what paint I had on hand (Bahr Premium Plus ULTRA Exterior Enamel) and set off to paint.

The color on hand was a dull olive gray. A paint color that’s intentionally boring. I purchased it for painting structural items in the Hosta Prison and the intent was that would blend in regardless of season. Not exactly the color I wanted. Not exactly the toughest paint either, but it would have to do. All in all the color looks great. Sadly it doesn’t reflect the amount of light I hoped for, but its not bad either. The most important thing is they are sealed and ready for business.


Indian summer struck again and I was able to finally spray Parakeet.
Check out the update here: More “Muscle Rack” Shelves